
The next match in the Tak Open finals that I'll be looking at is the first game between applemonkeyman (white) and SultanPepper (black):
This game starts out with the familiar adjacent corner opening (1. a1 f1). White opts to play close center (2. d3), which black follows with a far center (2. ... d4):
 |
| [1. a1 f1 2. d3 d4] |
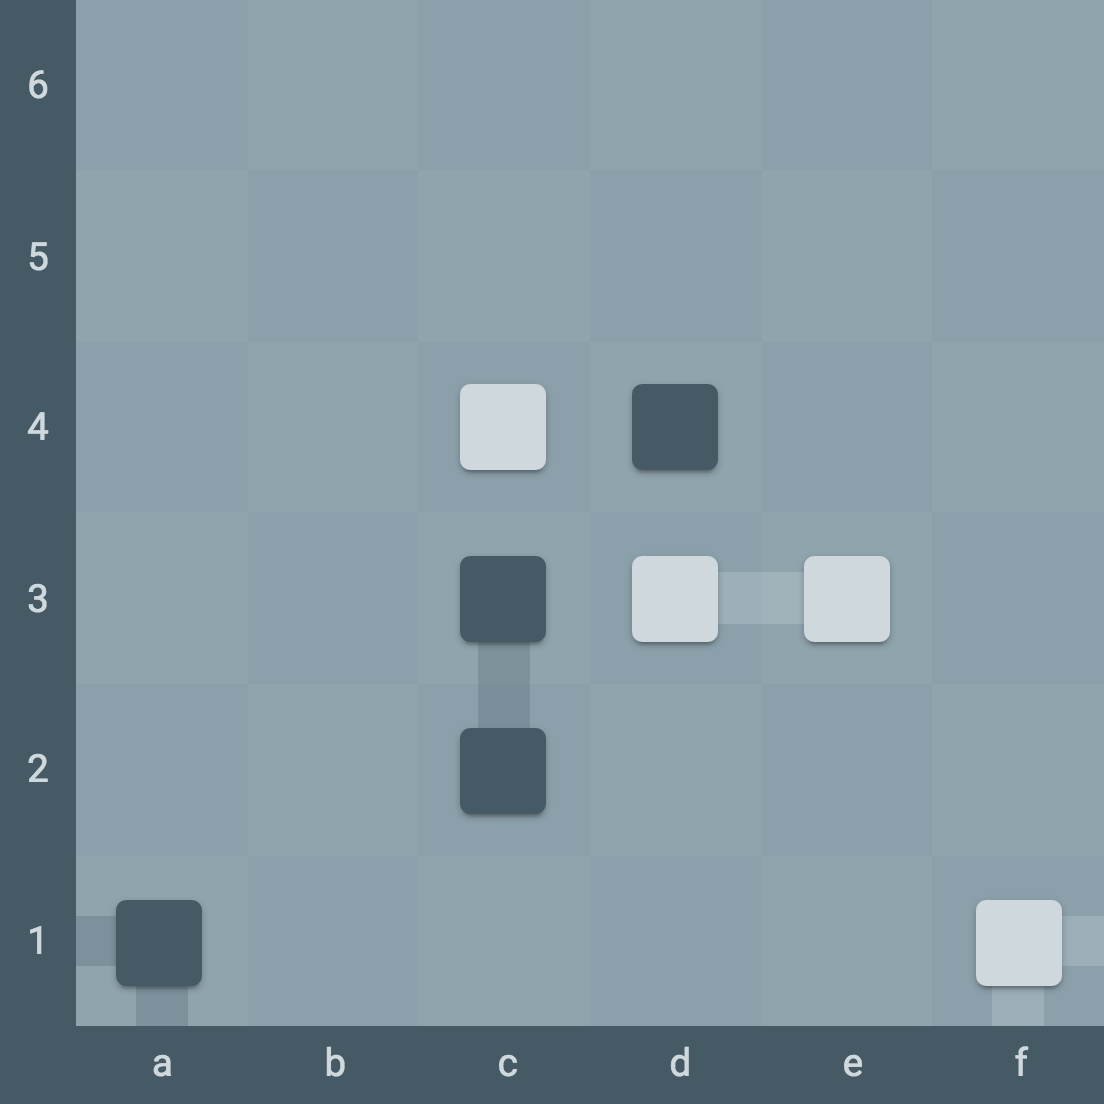
White extends east with 3.e3, moving away from the center and probably towards a closer connection. A more standard move would be to play in the center with c3, or even Cc3.
Black uses this as an opportunity to cut white's stones with 3. ... c3, grabbing the center for himself and establishing a nice diagonal connection.
In response, white cuts back at 4. c4, making his own entry into the corner. In defense, black plays the expected 4. ... c2, extending his own stones south.
Here, white plays 5. b3 creating a pincer on c3. This does create a weakness at b4, though, which may have been another move to consider in this situation. Black responds by placing an effective capstone at this weak spot, with 5. ... Cb4.
Black uses this as an opportunity to cut white's stones with 3. ... c3, grabbing the center for himself and establishing a nice diagonal connection.
In response, white cuts back at 4. c4, making his own entry into the corner. In defense, black plays the expected 4. ... c2, extending his own stones south.
 |
| [3. e3 c3 4. c4 c2] |
From this position, white chooses to make a capture with 6.c4-, creating a nice line on the 3-rank and cuts off black's pieces a bit. In addition, this does firmly establish white with tempo. On the other hand, such a capture may not be warranted. I would have considered e4, creating more of a support structure for white's pieces.
In return, black places at 6. ... c4, connecting the black 4-rank. It doesn't interrupt white's tempo, but is fairly solid. A more aggressive move to disrupt white's road would be to move black's capstone down with b4-.
 |
| [5. b3 Cb4 6. c4- c4] |
At this point, white makes a tak threat with 7. a3', encouraging black to make captures. f3' might be slightly better for this, as it also connects loosely to white's f1 stone. Black captures with 7. ... b4-, which also creates a pincer on c3.
White runs the c3 stack from the capstone with 8.2c3-, also claiming the c2 square. In response, black extends south with 8. ... b2, also threatening the stack at c2.
White runs the c3 stack from the capstone with 8.2c3-, also claiming the c2 square. In response, black extends south with 8. ... b2, also threatening the stack at c2.
 |
| [7. a3' b4- 8. 2c3- b2] |
White follows up with 10.c5, which seems to anticipate the different directions of the road threat. A more direct confrontation would be a play at b5, threatening the b4 square. This also gives black the opportunity to play 10. ... b5, extending his threat north.
 |
| [9. Cc3 b4 10. c5 b5] |
White responds by playing 12. d2? This does connect white's pieces and solidify his structure, but it ignores black's tempo. I would have expected white to play e4, extending white's pieces and blocking some of the upcoming west-east road threat. TakticianBot recommends playing a5, focusing on the north-south road threat and anticipating the a6 play.
Black takes advantage of this to make a tak threat and create pressure with his tempo lead by playing 12. ... a6'.
 |
| [11. b6 a2 12. d2? a6'] |
White responds by setting down a wall with 14. Sa4, helping to stymie black's pressure. In spite of this, black continues to press forwards and make yet another tak threat with 14. ... c5'.
 |
| [13. c5< a5' 14. Sa4 c5'] |
White blocks the new tak with 16. a3+. For the first time in a few moves, black just fills the gap left by white without making a tak threat, playing 16. ... a3.
Notice that although black and white flat counts are fairly close, black has now run through quite a number of flats from his stack, making a serious dent in his stacks and gaining influence over the board, while white was forced to defend. This sort of play is one of the major advantages of having tempo and the ability to chain threats.
 |
| [15. a4> a4' 16. a3+ a3] |
In response, black presses tak with 17. ... b3+'. White blocks this with 18. 2b5<, which does create some connectivity. A better play, though, would be 2a4-, which would actually create a real west-east road threat.
Black opts to fill in the new gap with 18. ... b5, which connects black's stones and increases influence. If black had wanted to continue to press for tempo with another tak, 3b4<' would have been a strong option.
 |
| [17. c3+? b3+' 18. 2b5< b5] |
Black responds with a double tak at 19. ... b6', which white blocks with 20. 3a5>. A better alternative to explore for this ply would be 2a6> instead. This is a good example of where order matters. Note how in the following move 2a6> will have lost its power.
From here, black is simply able to re-claim tak with a simple 20. ... c5<'.
 |
| [19. b6< b6' 20. 3a5> c5<'] |
And with 21. 3b5+'', black secures Tinuë.
 |
| [21. 2a6>? 3b5+'''] |
Think with mind of air
Listen close to heart of stone